
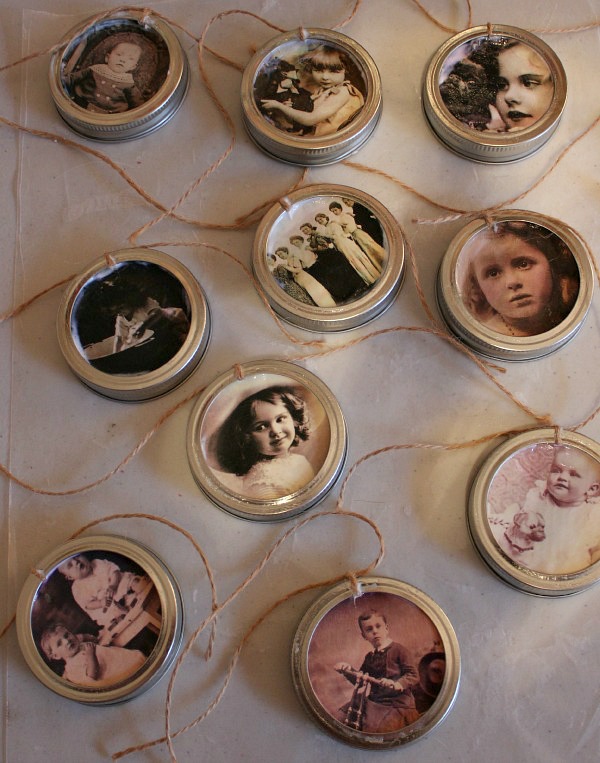
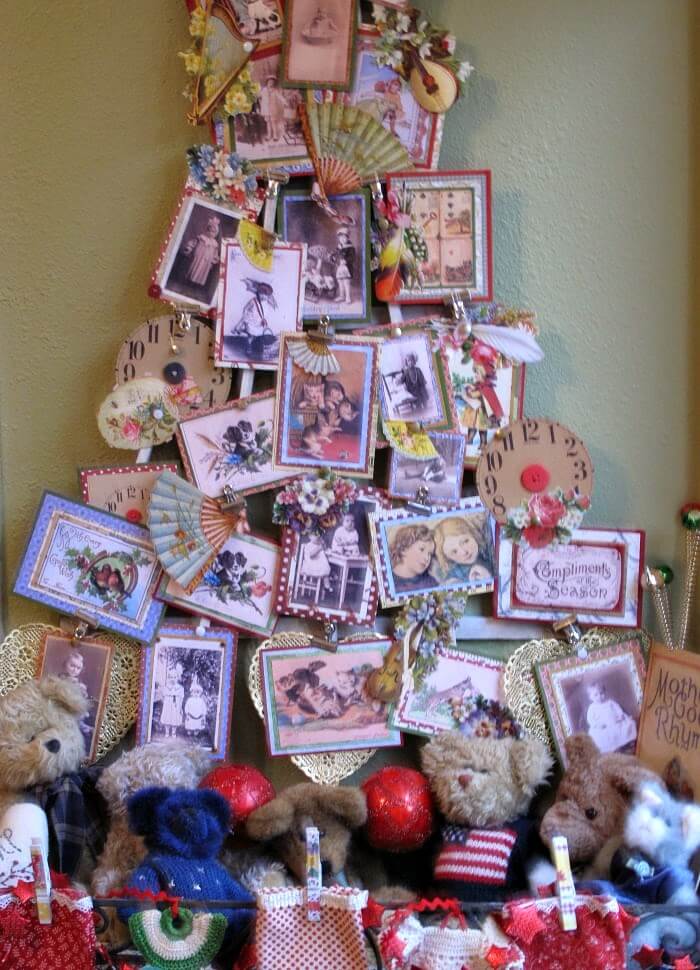
Homemade Vintage Jar Lid Ornaments
When I start something like this, I normally don’t know what exactly I’m going to do. I just go with the flow. That way when problems arise, I can find a way to adapt.
I purchased mason jar lids and bands from Walmart. They’re pretty cheap.
I then went through my old stash of vintage children’s photos.
Remember my old window I had hanging on the wall with vintage children’s images? Well, it fell.
No more window with vintage children images in the glass. That left me with some photos that weren’t too banged up or torn.

First I took the band and a pencil and drew around the outside of the section of the image that I wanted. It will be a little big, but I’ll go into that in a minute.
I’m working on sheets of waxed paper because I’m going to be using Mod Podge and I am a messy crafter.

Then I took the smaller lid and placed it over the image and drew the circle and cut around it. If I’d done that to start with, I wouldn’t have been able to tell what part of my image I was getting.
So I cut all my images out.

Then I took a foam brush and decoupaged the images to the lids and let them dry. There will be bubbles and creases. We’re not going for perfection.

Then I tried to decide if I wanted to use ribbon or jute to make the hangers. For the plain silver lids, I used jute. For the red ones, I used ribbon.
I made a double knot. Then I took my foam brush and put a layer of Mod Podge around the inside of the band. (Is that what they’re called? If not, correct me.)
I pushed the lid with the decoupaged image inside the band and held it down to let the glue adhere to it. (Or at least I’m hoping for success here!)
I looked all over this place for some other type of glue and couldn’t find any, so that’s why I ended up using Mod Podge to glue everything.
If you have a glue that seems easier and will adhere better, go for it.
Then after I’d held it down for a bit, I turned it over and put Mod Podge on the front.

Now these may not stay glued. If not I’ll have to go out and find another type of glue. But let’s hope this technique holds because it’s cold and rainy outside. And I don’t want to leave Abi.
Let dry. Then you might go over it again with Mod Podge if you want.

For the red lids, I looked in my stash and found this gold piece of scrap paper. I put these circles on the lids and I’m doing something a little different.
However it isn’t dry yet, so you won’t be seeing that right now.
And if it looks like crap when it does dry, you won’t be seeing it at all. As it will go into the trash can.
For this project you will need:
1. Mason jar lids and bands
2. Little foam brushes
3. Mod Podge or a glue of your choice
4. A sharp pencil
5. Ribbon or jute
6. Vintage images you print off the internet, or whatever you please
7. Waxed paper to work on
8. If you’re messy and clumsy like me, grab some paper towels
9. Scissors
10. Patience. Which I don’t have in abundance
I never know if I’m going to end up with a diamond in the rough or a dud. If you end up with duds, toss them and just go buy ornaments.

Love these! ! How creative and such wonderful ornaments!
I have been looking for a way to bring my family together this year. I am going to find photos of my brother and sisters from when we were children and do an entire tree (small one). Many, many thanks for the idea!
I love your old photo ornaments, Brenda. I'm going to look through my photos and see if I have some good ones. I think they'd made terrific family gifts.
Glad you got your "craft" on Brenda! Adorable!
Brenda, these are adorable! You always figure out the neatest ways to decorate anything. My prayers are with you and the puppies. Thanks for sharing another neat idea.
Hugs,
Connie, IN/FL
I LOVE this idea! Looks like something that would cost a fortune in the shops. Thanks Brends!
This is a really cute idea, Brenda…thanks for sharing!
These are so stinking cute!! Thanks for the directions!
How is the weather in your area? I heard OK was very hard hit and a lot of people lost power.
Jane x
Very cute…..fingers crossed that it works
Very cute…..fingers crossed that it works
These are really nice Brenda!…They would also make a nice garland to hang..I will give it a try..Thanks!
Oh- How sweet are those! That is something the grands could do, too. They would love it. Thanks for the idea, Brenda. Hope you have a great night- xo Diana
These are cute and the images you could use are endless.
I love this idea. This may be something I do with the photos that are on regular paper of my grandpa, grandma and greats….. Such a neat idea!
Those are adorable…… good thinking ~!
Brenda, you're amazing – what a cute idea!!! I'm anxious to see how the red ones come out!!
They look great. I love your attitude for crafting. I need to adopt yours. I want to make some ornaments for the tree. If they don't turn out, I'll head out the door to buy some! You made me smile.
Oh, Brenda, if I could find images as darling as yours, this would be a good idea for tree ornaments in the shop.
Ginene
You can google old photos. there are a lot of them. download them, save them to a disk and then take the disk to Walmart to have them printed.
Thanks for the idea to tie the string around the "frame," Brenda! I used Dollar Store small metal frames for family photo ornaments and just tucked them in the branches but I like your hanger idea much better. Appreciate you sharing!
I love this idea. Very cute ornaments!
Cute ornaments and fun to make. Thanks for sharing!
Looks like fun and you could use any images to suit your style! Cute idea!
Linda
This is really a pretty project !!